


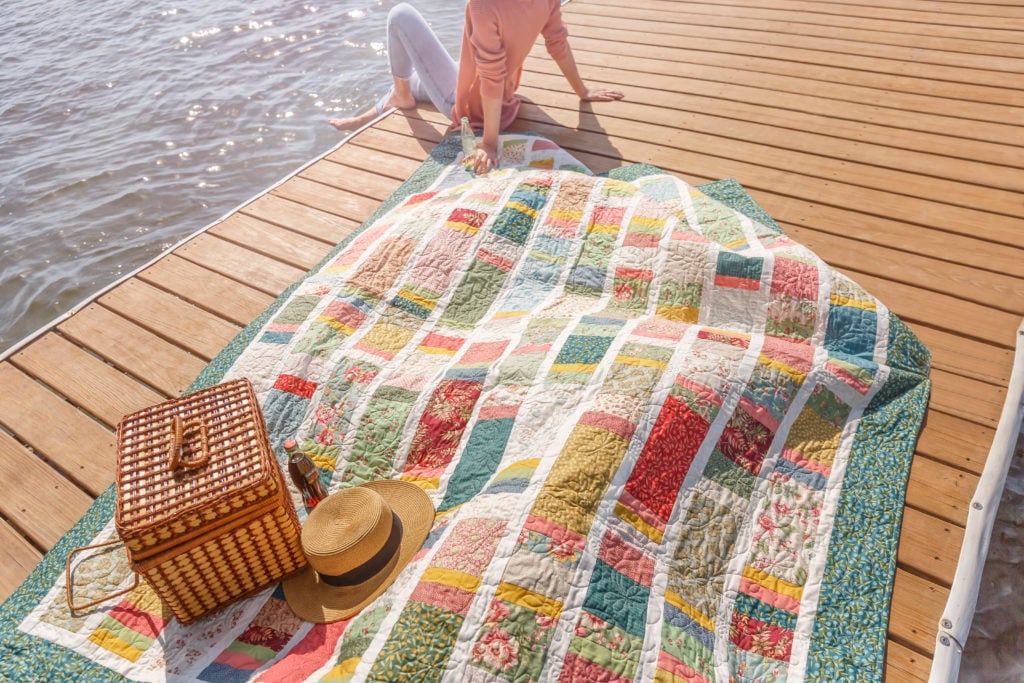
Boardwalk Quilt Tutorial
Jenny Doan
Boardwalk Quilt Tutorial
- 1 pack x 10" Precut Fabric Squares (Layer Cakes) - Print
- 1½ yards x Coordinating Print Fabric - includes Outer Border
- ¼ yd. ea. x 3 Different Solid Fabrics
- 1 roll x 1.5" Precut Fabric Strips (Honey Buns) - Background (incl. Sashing and Inner Border)
- ¾ yd. x Quilt Fabric for Binding
- 5¾ yd. x Quilt Backing Fabric
Featured products Get the Supplies Featured in this Tutorial


Finish your masterpiece and let us give it the finishing touch it deserves.
Subscribe to MSQC on YouTube
Hundreds of FREE tutorials and a new one from Jenny launches every Friday.
video transcript
Hi everybody, it’s Jenny from the Missouri Star Quilt Company. And take a look at this quilt behind me. This is such a fun quilt, very simple. This is a great beginning quilt although it looks like you worked really hard. It reminds me of a boardwalk so we called it Boardwalk. When I was a young girl we would always go to the beach over in Santa Cruz and they had this fabulous boardwalk across the sand and that’s exactly what this reminds me of. So this quilt is super easy. It’s made of long columns that you sew together but there’s really only two columns. And so we have our A column and our B column and some of those columns we flipped and it’s all in the cutting and the sewing. So let me show you how to do this. So to make this quilt you’re going to need one packet of ten inch squares. And we have used Seamstress Sundays by Edyta Sitar for Laundry Basket Quilts for Andover Fabric. You’re going to need 1 ½ yards of a matching print for your border and this includes four extra squares to add to your layer cake for a total of 46 squares. You’re going to need ¼ yard of three coordinating solids. You’re going to need one roll of 1 ½ inch background strips and we have used Kona Snow. And you’re going to need 5 ¾ yards for your backing if you want vertical seams or three yards of a 108.
You’re going to take your whole layer cake and you’re going to cut it just like this. We’re going to cut a five inch piece off the side just like this. And you’re going to make stacks of these and so because you’re going to do this to your whole layer cake. So our five inch goes there. We’re going to turn our piece. We’re going to cut another five inch off just like this. And then we’re going to cut this last five inch square into a two inch piece and a three inch piece. So we’ll have all these set out like this and we’re going to do that to our whole layer cake. Then you’re going to take your three coordinating accent fabrics and this is what really brings this whole quilt together and gives it so much interest and movement. And you’re going to cut those into 1 ½ by five inch strips. And so we’re going to have piles of those as well. Now most of the layer cakes come with like all the blues are in one area, you know, all the reds, pinks are in one area, all the light are in an area. And I separated all those out so that as I was pulling from things I was pulling different blocks to sew together for each one.
So on this first column here what we’re going to talk about is this column right here, this number 1 column. That was kind of awkward, this number 1 column right here and how we put that together. And so you’re going to start with one big piece. Now one of the things I noticed in sewing this together is the only thing that really mattered to me, that caught my eye was if your large pieces seem to line up. You know, if they seem to line up then, you know, move your pieces around or something. But that was what caught my eye on this so I like to see those stagger a little bit. Now on, when we start putting our column together it’s just super simple to keep track of. In the pattern there’s going to be a layout like this. And what I did was I put column A, this is column 1 so A equals 1 in my mind. And since I kind of sew by pictures, you know, I have a hard time with the words, I tend to use these diagrams a lot. So in using this diagram I put a number next to this piece right here so that I know I need three of these. And so I have three of these ten inch pieces like this. Then I have two of my little solids which you can see I made a little mark out to the side. And then I have a two inch and a three inch. And I’m going to need three of those little units. I’m going to need two of the next one, a five inch, a 1 ½ and a two. And then down here I’m going to need one of this unit right here and one of D. One just plain five by ten inch rectangle.
So when you put this together, honestly all that matters is that you get the same pieces on there. It doesn’t matter what order it is because it’s going to end up actually the same length even if you mix up those pieces and do that sort of thing. So for me this also, when I finished this and looked at it, I was like, this would make the best stash buster quilt because it’s just like you can get all those like colors that you want and put them together in a quilt like this and it’s just going to come together really quick.
So let me show you how to make block A. To put these blocks together we’re going to need to cut a few more of these. And that’s never a bad thing. So I’m just going to line these up. And I have a stack here of about six. You cut whatever you’re comfortable with. And the sharper your blade the more you can cut. You can also cut more if you use a 60 inch rotary cutter. I don’t know if you knew that but that’s true. Alright so I’m going to cut a five inch again, put it in my pile. I’m going to turn these. And you can see they’re off a little and we don’t want that. We want them just lined up exactly. So let’s see if we can get these exactly. I’m going to cut my five right here and then I’m going to cut a two. So I’m laying my ruler right on the cut. I can move this so you can see on there. I’m going to cut a two and that’s going to leave me with a three. And I’m going to show you how to put block A together.
So the first thing we’re going to do, this is block A right here put together. And we’re going to start with a three right here and then we’re going to grab a two. Now you know I just want something that’s a little bit different. And so I’m just going to grab a lighter one here. And then, and you kind of want to do this when you put every block together. You just kind of want to lay them out so that you know what you’ve got. So I’ll put a yellow. I think this needs some brightening in here so I’m going to stick a yellow on here. I’m going to stick a pink on here. And then I’m going to grab this one on the bottom. I love this print. I think it’s so pretty. And then we’re just basically going to sew these together. So we’ll go to the sewing machine. And we will sew our quarter of an inch and we’ll just sew these together. And for the first column you’re going to need three of these block units. So I’m just anchoring, making sure I’m lined up. Just sewing down. I’m just going to kind of finger press this back. I’m going to add my little yellow. Now on your little contrasting pieces you just want to make sure that they pop, they stand out. It’s kind of, this is kind of the glue that holds the quilt together. So if we have these three colors. You know we actually laid our whole fabrics out and just tried out, auditioned a bunch of fabrics to see which ones would look best. And some right away, it was like, oh no there’s too much of that in there. That won’t even show. And so make sure you audition some fabrics and you get some that just bring it all together but stand out still. So it’s kind of fun to do when you’re working with solids. Alright one more. Now we’re going to add our long piece right here. So now let’s press this. And we’re just going to iron this back like this. I like to press from the top to make sure there are no pleats. And then I’m going to flip this over and I’m going to make these little press lines go the same direction. We’ll give them a little bit of heat on there. You’re going to make three of these for column A. And here’s how it fits. Here’s the very first block right here.
Ok so let’s move onto column B. The B is a five inch square, one of these right here. And we are going to pick this one. And then you need your two inch here. So let’s go with this red and then an accent color again. And we used the pink and the yellow over here so I’m going to throw a green in. And so this is going to go right on top here. And we will go over and sew these together. Now for this B block you’re going to need to make three of these. And then we’re just going to sew them all together in one long column. So this is a quick little easy one. Alright we’ll press this one. There we go. Alright and again you’ll need three of those.
Now for C block right here, this is our C block. And you’re only going to need one of these and we are going to take a three inch. And we’re going to take a 1 ½ inch of our accent. We’re going to take a two inch of our print. I’ve got these going all over the place right here. And then we’re going to put two up on top. And I’m going to put the, oh I’ll do the green and the yellow. Now remember these can go actually in any order. I mean you could mix these all up. But it’s still going to end up measuring the same size. So it’s the length of the block that we’re looking for. So if you decided that you’d rather have them like this, you know, nobody is going to die over that. It’s going to be fine. But we’re going to do it just like we have it in the pattern so I can match it up on the column for you. And so let’s go ahead and sew this together. I’ll sew these first two little guys. And I’m going to lay these right on top of each other, sew a quarter of an inch down the side. And then we’re going to add our two inch piece. Again these little strips are 1 ½. And we’re going to add our two inch. And then we’ve got our three inch piece right here. I think these fabrics are so gorgeous. And then one more accent piece on the bottom. Alright, then what we’re going to do is we’re going to press this. Now for this column you only need one of these, just one. And so the D block is the easiest of all. Tah dah, we’re done. Just like that. No sewing. You just need one of those to add to the bottom of your block like this.
So now we’re going to refer back to this diagram. And you can see exactly how they go together. This is column 1. I have all the pieces ready here and we’re going to sew them in a minute. But I just want to walk you through it. So it has this A piece, our B unit, our C unit, then another A, B, then another A, another B and another D. Now if you happen to get these messed up, it’s not going to matter. It’s going to be fine. It’s going to be fine. We just have this diagram to make it easy for you. So first of all I’m going to take these little blocks right here. And we have our A block right here. Here’s our A and we are going to connect that to a B right here. And so we have several B’s that are in this. And I’m going to look for one, so see how this is real close to the same fabric. I don’t want to put that one next to each other so I’m going to come over here and we’re going to pick this B right here. And then we’re going to look for a C. And even while I’m sewing this, you know what, I can get it messed up. But it’s not going to matter because at the end of the day we’re looking for a column that is 84 inches long. Now what happens if your seam allowance is different than mine and it works out that it’s 85. Well there’s two things you can do with that. One, if all your strips are 85, put them together at 85. Two, you can slice this off at any place and it will be fine. Alright so we have A, B and C. And our C block is this little block right here. So you see here how I have a little piece of paper with a letter on it. You might want to put all your C blocks in a pile, all your B blocks in a pile, all your A blocks in a pile so you can just pull from them and make your rows. So now we’re going to take this C block right here and we’re going to add it to here like this. And then according to our diagram we go back to A. So here’s our C and then we’re going to attach this A. We know A is the long one. So we’re going to attach that on here. Now could I flip it over? Sure I could. You know let this design part come out in you so you can make it however you want. Alright so now we’ve got our A block on here. We’re going back to the column. And I can see I need a B block. And I have one right here. And we’re going to add that. Now that’s a little close for me so I’m going to look in my pile and see if I have another B block and I do. I think I’ll add this one instead. So there’s B right here, a quarter of an inch and then we’re adding another A right here. And it really does help to have this diagram. I just refer to it every time I put a piece on, I look back and see where I am. And then we have another B which is here. Let me make sure this is a B, yep. And they’ve got it going this way so we’ll put that on. And then our last block is a D. Alright so this is column A.
Let’s come over here and give it a press. I’m going to move these things out of the way over here. Alright so we’re going to press this column 1. And for column 1 you’re going to need six of these. So every other one is column 2. Column 1, 2, 1, 2, 1, 2 and so you end up needing six of column 1 and five of column 2. But then it fits into our quilt, you can see right here it fits into here just like that. And so again you’re going to need six of column A.
So now we’re going to work on Column 2 and column 2 is made out of three of exactly the same block. So we have our E block, E block, E block and then our little F block here on the bottom. So if it helps you, which it does me, I go along and wherever there’s a solid fabric that I know is going to be one of these pieces, I just put a little tiny mark by that. This one I know is a five, this is a three. This is going to be a two. And then we’ve got our ten inch piece here. This is going to be a solid. And so when I’m picking them up, it really helps me because I already know the sizes I need. Two, three so and that’s inches, two and three inches. So we’ve got our twos, we’ve got our threes, we’ve got our fives and we’ve got our tens. So we’re going to start with one little strip right here. I’m going to start with the yellow. And then I’m going to grab a five inch and then I’m going to grab a three inch. And then we’re going to grab a little two, one of these. How about this guy right here. And then we’re going to grab a ten and I want something different than these two so. I am definitely not a matcher so this will go with this guy. Scoot these up for you. And then we’ve got another piece here, a solid, one of our accent pieces. And again these are our 1 ½ by five down here. And then we’ve got another two. And I’m going to go for this blue and a three. And I am going to grab this one right here. So this one and this one. So the E block is actually, you know, a pretty long block so just lay it out like this so you can keep together your pieces so you know exactly what goes where. But again if you get them in the wrong place, what matters is that, it’s the same measurements so it doesn’t matter which direction they go in. It just matters that you get them all in there. So we’re going to put our three on here. And I’m just going to go right down the row and make this E block like that. And then we have a two. Let’s see, yes a two. You can see I’m second checking myself all the time. I believe it’s better to check than to rip so it’s ok if you want to look at it a few times. I don’t trust myself at all to get this right. But what I know is that even if I get them in the wrong order, my strip just has to measure 84. Alright then we’re going to add our little accent right here. I just think these colors are perfect for this line. And then we’ve got a two like this. And then we’ve got our three. And you are going to make three of these E blocks for column 2. So let’s go over here and we’ll press these out right here. And then I’m going to flip this over and I’m just going to run my iron right down it to make my seams go the same direction. It won’t matter what directions the seams are going in. They don’t have to nest to anything which is part of the fun of this block. So then you have this nice E block. You’re going to make it three times.
Now we’re going to make the F block which is a little shortie. I’m going to start with the green right here. It looks like it’s a little color. And then we have our five inch right here. And then we have a three inch right here, a two inch and then two of our little colors. And we’re going to do the yellow. We’ll do the pink first and then the yellow. So this is our F block. And you just need one of those. So we’re going to sew this one together. Again a quarter inch seam. Just lay them right next to each other, right on top of each other like that. And then we’re going to add our next three inch piece to that. And then we’ve got a, let’s see. We’ve got a two. You can see I have the piece there. I looked at one and put it out but I’m still looking at it because I want to make sure to get it right. And that’s mostly for you guys. I just want to make sure that you guys are able to make this yourselves because it’s really fun, super each sewing. Just straight strips like this. And then our last little accent fabric on here, right there. Take a few anchoring stitches, line it up and sail across. Alright so let’s press this now. So again for this one you’re just going to need one of these.
So let’s go ahead and sew column 2 together. And I believe it’s this one right here. We have three. We have one, two, three of these long blocks right here. And then we’ve got our F block right here that we have ready. And so I’m going to look and see so my little color is at the top and they are all laid in there the same. So the little color is going to be at the top. And we’re going to sew these two long E blocks together. We’ve got E, E, E, and an F. There we go and we’re going to add another E. And when I do this I remind myself always that the little, the smallest strip was at the top. So that’s the one I’m going to put on the top of these. And then our little F block is the last and on the F over here. And on the F the little small strip is up at the top as well. And so we’ll just add that to the bottom and this makes our column 2. And column 2 we just, we needed five of. So I’m just going to press these seams right here. There we go. And then this is column 2 right here. So see how that works. And it’s just a matter of getting the right sizes together and putting it together, having your fabric match and coordinate.
So now I want to talk about sashing a little bit. You know, in the quilt community it’s like we have a language that’s all our own. And every once in a while somebody will say, what is sashing? Well sashing is this strip that goes in between your blocks. It’s often used to frame your block or set it aside. It can also be a great way to make your quilt bigger, you know, if you’re putting big sashings in between here, that quilt is going to get really big really fast. For me it was about separating these columns just a little bit, you know, so they have a distinct look to them and all the colors can then do their job of popping and being, they can all feel important, all those little colors. So this sashing right here, this is a 1 ½ inch and they come on a roll. Now I can’t even tell you how convenient that is for me to be able to buy sashings 1 ½ or 2 ½. And they’re on a roll. We’ve just chosen a creamy kind of background color for this.
And for the sashings on this quilt you’re just going to take two strips and we’re going to sew two strips together and that’s enough for your sashing. So what I’m going to do is I’m going to cut off my little selvedge edge right here, just cut them both off. So when you go to sew a strip together, what you’re going to do is you’re going to open it up like this. And it has a fold mark, a crease mark from being folded in half in the roll. And I use that as the right side. Often fabrics have a right side and wrong side and you want to sew right sides together. And for me because this fabric has no wrong or right side, it doesn’t really matter. But if you’re going to sew a whole bunch of strips together it’s just a good idea to get in the habit of putting them right sides together otherwise you’ll sew them wrong and a seam will be up this way and a seam will be down that way. And that’s always so frustrating when you’re adding that on. So I pretend the fold marks the right side of the fabric and I just sew those two strips together so that I can have one, it will be one strip set for each column. So just that little seam and we have enough for our whole column here. Let me show you. And it will go in here like this. Now it also makes this first inner border. So as we put our quilt together we’ll put a strip on that, outside of that first row. And this is column A right here.
So what I will do is I will sew my strip to the outside edge of this right here. And then I’ll sew another strip to the next strip right here. And then I’ll add this second strip to that. So let me just show you how easy this is. So I’m just going to start here on this side. Now one of the things I want you to look at right here is that these aren’t all exact. See how some of them are a little bit longer, a little bit, you know, this slides in and out. That’s not going to matter because we can hide those in our quarter inch seam. So what I’m going to do is I’m going to lay this sashing right on top here. And you can see it sticking out and in a little bit. As long as they’re caught in that quarter inch seam it doesn’t matter. We’re going to take it over here to the sewing machine. Now one of the things you want to remember always when sewing on sashings is that your sashing should always be on the top of whatever you’re sewing. So it will be on the top here like this. And the reason for that is that the feed dogs actually bring in more fabric. And if you have the sashing strip on the bottom that will ruffle that fabric and it will change the length of your strips. And we don’t want that so we’re just going to lay this strip right on the top here. And I’m just going to, you know, I like to do a few little setting and then I’m going to get myself a nice long area to sew across. And I’ll just let that go. And then I stop and make sure it’s lined up. And make sure that it stays right on the edge. And I’m just going to do that all the way down this side. Now because this is my first row, I will also add a sashing to the outsides. So that way, that first border is almost on when we put all these rows together. Alright so now I’m at the end of my strip right here and you can see I have a little piece leftover. And I’m just going to trim that off. And then I’m going to press this open. And I’m going to press it so that the seam goes toward the sashing. And so I’m just going to go along and do this whole strip like this. And then we’ll add column B to this.
Alright so you can see now I’ve added two sashing strips to either side of my row which means I have added my first inner border right here and this next border. So now I’m ready to put another strip with it. And this is column A so I’m going to grab a column B. And I’m going to put it together. Now my column A actually is right sides up right here. See what’s going to happen here. I have this B right here. Well I may not want those that close. So I can just flip this if I want to. So what I’m going to do is flip this over like this and we’re going to sew this down this side. And because I like to keep my sashing strip on the top I’m going to start from the other end and sew up. That also helps when you sew down one side and up the other it helps to keep it from bowing. And I just like to keep my sashing strip on the top and so we’re just going to lay this on here. There’s no need to pin unless you want to. And just sew down this side. And so in that way we’re just going to keep adding rows. Then we’ll add another sashing strip and another column and another sashing strip and another column. And we will just go between column A and column B. Alrighty so there we are and we’ve added our second column to that and you can see how quickly this is going to get nice and big.
So let’s go back and look at the quilt. So we have one, two, three, four, five, six, seven, eight, nine, ten, 11 columns. Every other one. This is column A here. So six of those and five column B. You’re going to need to sew your sashing strips together and you’re going to need to sew one, two, three, four, five, six, seven, eight, nine, ten, 11, 12, 13 and 14. 14 sets of two together which I would have those all sewn and ready to go so I could just grab a column, grab a strip, grab a column, grab a strip. Then we’re going to add our outer border on here. This is a nice five inch border. And the backing back here, this is a pretty piece for the backing. The quilting pattern on this is Little Nature. It has little butterflies and little flowers and things like that. It’s very, very cute. So it makes a quilt that is 70 by 94. Now this quilt actually uses 46 layer cake squares and so to do that we took a ten inch strip off of our border fabric and cut four ten inch squares out of that and just added them to our layer cake because we just wanted it to be a nice twin size. And I just think this is gorgeous and a gorgeous way to do it. So we hope you enjoyed this tutorial on the Boardwalk quilt from the Missouri Star Quilt Company.
We hope you enjoyed watching this video. If you’re not already part of the Missouri Star quilt family you can hit the subscribe button below so you won’t miss a thing. And if you click that bell it will notify you every time a new tutorial comes out. See you next Friday.
& Progress on Social